To get more out of your Home Assistant installation, you can install Portainer as a Home Assistant add-on.
For those who are not familiar with Portainer: it allows you to install and configure Docker containers via a graphical user interface. This means you can install tools that may not be officially (or unofficially) available as Home Assistant add-ons. As I have repeatedly referred to Portainer in previous articles, I will write a separate article on this topic so that I can refer to it here.
Installation
To install Portainer, click on ‘Settings – Add-ons – Add-on Store’. Click on the three dots in the top right corner and then click on “Repositories”. Enter the following URL in the ‘Add’ section at the bottom:
https://github.com/alexbelgium/hassio-addonsThen click on ‘Add’.
You should then find Portainer in the add-on store. You can install Portainer there.
Once installed, you can start the service.
Access and usage
In a standard installation, you can access the web interface at http://homeassistant.local:9000.
User: Admin
Password: homeassistant
The password can be changed in the add-on under ‘Configuration’.
If you click on ‘Container’, you will see that containers already exist. This is because the Home Assistant add-ons are also just Docker containers. However, you should not modify these.
Troubleshooting
Error Message
It is important to note that if you create containers via Portainer that were not created from Home Assistant, you will find a message like this in the repairs:
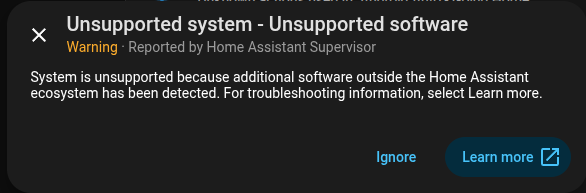
This alerts you that unsupported software has been installed.
If you know what you are doing, you can ignore this message.
Sidebar
Normally, you cannot add services installed via Portainer to the sidebar. The reason for this is that only external URLs that are accessible via HTTPS can be entered in the sidebar. This is not the case with a standard installation.